Thursday, February 17, 2022

Adventures With Ruby

The adventure began when, last fall, a friend called to encourage me to go to an estate sale in a barn out in the county.  She said they were selling lots of needlework items, and she was right!  The homeowner was definitely a crafty lady, into knitting, cross stitch, quilting, just to name a few!  I found a few pieces of fabric and some notions, and as I was checking out and chatting with the relative of the deceased homeowner, I mentioned that I was a quilter.  She said that there were several quilts still in the house that they weren't sure what to do with.  I made arrangements with her to take a look at them one day the following week.

Most of the quilts had been well-used.  They were not in very good condition...not something I would be interested in having for myself, so I gave her some ideas of others who might be.  One quilt, however, caught my eye and I told her that it was worth saving somehow.  That quilt was composed of beautifully embroidered flower blocks that I recognized as Ruby McKim designs.  Something else that I noticed was that the embroidery was done on blocks cut from sugar or flour sacks...the printing was still visible on some of them!  The quilt's label says that it was started in the 1930s and finished by the maker's daughter in 1998. 

When the relative saw how excited I was about the quilt, she told me to take it and see what I could do with it.  I envisioned reworking the quilt, preserving the embroidered blocks.  As it was, the quilt was huge...40 embroidered blocks set with alternate print and white fabric squares.  I knew it would be a big job to take it apart. 


That job turned out to be even bigger than I had anticipated!  The blocks had been joined quilt-as-you-go style, but SERGED!!!  It took me many hours to take the quilt apart--my seam ripper got a workout!  Another discovery was made once the blocks were separated and the batting removed--there was iron-on interfacing on the back of the embroidered blocks.  Luckily that just seemed to easily peel off with no sticking or residue.  

So, how to clean and freshen up the embroidered blocks?  Per Rebecca Haarer, purveyor of antique quilts in Shipshewana, OxyClean™ and Dawn™ were used.  The blocks were soaked, hand washed, rinsed and laid out flat to dry.  Most of the stains came out...some of the sugar sack printing became fainter, but still remained visible on many blocks.  

At this point, the blocks were very wonky.  


After pressing them, I was able to trim all but 3 of them to  7 1/2" square.  To give them stability, I backed them with muslin quilt backing fabric which I cut to the same size and hand- basted around the block edges.  

I was asked to make small quilts for each of the quiltmaker's 3 granddaughters.  Perfect!  I had thirty six usable 7 1/2" blocks so 12 blocks would be used for each quilt.  The smaller blocks were set aside to be made into matching pillows.  

Solid green fabric was used for sashing and borders and each finished quilt top measures ~30" x 40".  The quilt tops will be layered with cotton batting and muslin backing.  Simple big stitch quilting and green binding will finish them off.  


This project has turned into more than just preserving the blocks, however.  As I worked with them, I had to know more about them!  Ruby McKim designed several series of quilt blocks for publication in newspapers and I wanted to know the name of this series and exactly when it was published.  In my collection of quilt ephemera, I have 3 newspaper cutouts from this series, which was titled "Flower Garden Quilt Patterns".  The text that goes with the block images says that the series would contain 27 designs.  


Searching the internet, I discovered the site https://mckimstudios.com and learned that this series was published in newspapers during 1929-1930.   Obviously the maker of the quilt that I was working with clipped the designs as they were published and had a pretty complete set!  

The printing on the background of the embroidered squares also intrigued me!  I could make out "Sparkling Crystal White" and what I thought said "Central Sugar Co." so I began another internet search.  Between that search and asking Merikay Waldvogel for some help, I learned that there was a sugar beet processing factory in Decatur, IN, about 20 miles south of Fort Wayne (where we live)!  It operated in the 1930s, so of course the quiltmaker would have access to sugar sacks for her needlework background fabric! 

What a fun and interesting adventure it has been to continue work that was begun almost 100 years ago and to preserve that work for future generations of the family of the quiltmakers!  


Monday, January 17, 2022

A Fabric Study

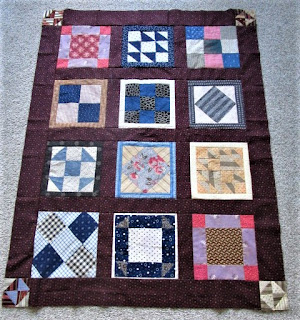
It was in the early 1990s that I became interested in really learning about "old" fabrics.  I have been collecting quilt tops and quilt blocks since then.  Now it has been fun to preserve these vintage quilt blocks by making them into small quilt tops. 

The blocks that were used in my latest quilt top were chosen because they were a similar size--by bordering most of them out, I could size them all to 8 1/2".  

But as I worked with these particular blocks, I realized that they represent just WHY I started collecting:  From blocks and unfinished tops I could study types of fabrics as well as piecing techniques.  

In general, these blocks contain fabrics from the time period of 1880-1920.  

There are Double Pinks and fugitive purple (dull in color and blotchy) in this corner block:


A black (mourning) print and cadet or "soldier" blue were used in this 9-patch block:


Brown prints of the mid-late 1800s are called "madder" browns, and are in the corner blocks of the border of my little quilt:


Navy background with white prints are typical of this era, as are shirtings--small prints on a light background.  The small triangle fabrics in this block are mourning prints:


In my studies, I was surprised to learn that ginghams and wovens were popular during that time period.  This block features two different checks plus cadet blue:

And I discovered that some fabrics produced around 1900 are thin, almost like cheesecloth! The shirting in this block (that also contains mourning prints) has an area that is VERY thin!


A variety of techniques were used to piece these blocks.  A couple of them were pieced by machine.  Most were pieced by hand, seemingly with quilting thread.  The running stitch used was small and very regular in some blocks; in others, crude and uneven.  Two of the blocks were pieced with a back stitch all along the seam.  

Our quilting "fore-mothers" did not remove the selvages from the fabrics they used.  And often they pieced chunks of fabric together to make a piece large enough to fit where needed.  A section of the scrappy nine-patch block was not large enough, so instead of replacing the entire corner square, I merely pieced in some vintage fabric so I could trim the corner to the size needed.  


This project, then, is the perfect study of vintage fabric.  If I decide that this top should be quilted, all of these "clues" will be hidden!  Perhaps a good use for this quilt top would be to leave it as is and print out all of this information to go with it from which future quilters can learn? 


Sunday, December 19, 2021

Red Fabric Woes

With Christmas right around the corner, I thought I would gather all of my red/cream vintage blocks to see what I could make from them.   I have seven 9 patch blocks and 2 larger ones that I thought could somehow be worked into a lap quilt.  

First of all, though, I wanted to see if the red fabrics were colorfast.

I began by pressing them with the iron set on "cotton".  Unfortunately, like other vintage red fabrics that I've tried to use, the color transferred to my ironing board cover/press cloth.  

I really wanted to work with these blocks, so I decided to try to set the color.  A strong vinegar/cold water solution was the first thing I tried. The blocks were soaked in that for several hours.  While soaking, some color came out in the water, but did not transfer to the cream fabrics.  The vinegar solution was rinsed from the blocks under clear, cold water.  I noticed that the water was still running red/pink.  

What next?  I made a strong solution of salt/cold water.  Again, the blocks were soaked in this for several hours.  When rinsed, the water seemed clearer, so the blocks were laid out flat on a towel to dry.

After all of the soaking and drying, the blocks were a bit wrinkled.  So they were pressed with the iron set on "cotton".   To my dismay, still a bit of color transferred to my white press cloth.  

I am really curious as to why the red fabrics do this.  I have tried to research the fabric dying techniques of the last quarter of the 19th century by consulting one of the books in my "library"--Clues in the Calico.  I could find nothing there.  I tried an online search for an answer.  No luck, but someone else had had the same issue several years ago and her query had not been answered.  I even sent emails to vintage fabric experts, Xenia Cord and Barbara Brackman .  Xenia replied that she has had the same thing happen, and is pretty sure that synthetic dyes were used for red fabrics in that time period.  She didn't give any solutions to the problem, however. 

I decided to just put the blocks back in my stash for now.  I did not want to spend time on a project that may give me problems in the end because of red fabric "run".  

It didn't take me long to begin another vintage block project--it's in the works!   

Wednesday, November 17, 2021

Wonky Wrench Blocks

To my way of thinking, it is a challenge to try to fit random blocks together into a quilt top.  It is usually easier to work with a set of similar, coordinated blocks. 

But this was not necessarily the case with a group of 6 churn dash style blocks.  (This block design is more appropriately called "Wrench".  Unlike the true Churn Dash, the center units of the block are smaller than the corner 1/2 square triangle units.)  These blocks date from the late 1800s, and were somewhat "wonky" to start.  So how was I going to deal with the "wonkiness"? 


Several years ago I had used a technique to frame blocks that made the blocks tip one way and another.  Perhaps bordering the blocks this way would disguise the crookedness and slight size difference.  

I found the instructions that I had followed in the past*, and using my favorite brown/black fabric, bordered the blocks.  Three tipped to the right, and three to the left.  The blocks were squared to 9 1/2". 


My next decision was whether to set them right next to each other or to use a light sashing strip between the blocks.  Each block would show off better with sashing between.  But print fabric or plain?  The print seemed to be too busy with the prints in the blocks, so 2" strips of muslin were cut for sashing and 2" squares of the black/brown fabric for cornerstones.


The sashing and cornerstones were continued around the outside of the blocks to border them.  Once the piece is quilted, I will bind it with the brown/black fabric to finish it off.  


This small quilt top measures ~23" x 33 1/2".  It's the kind of quilt that I like to drape over the back of a chair, and I have the perfect spot in mind.  :)


*The instructions I followed to border my blocks came from an old issue of Quick Quilts (vol. 13).  The article was titled "Twist and Turn Sets".   I discovered that the technique has been updated and improved.  Check out NO WASTE WONKY FRAMED BLOCKS  on YouTube.  https://www.youtube.com/watch?v=kPpHJrUXCSk  It's a fun and unique way to set quilt blocks!


Sunday, October 17, 2021

Preservation

 My collection of vintage quilt blocks is sorted first by "period", then by size of the blocks.  My goal in using the blocks is to basically preserve the wonderful fabrics from which they were made.  

I recently worked with a set of small blocks, measuring ~6",  pieced from fabrics dating back to the late 1800s.  With the exception of one block, they are 9-patches.  (In order to have enough blocks to make a lap-size quilt, I included a Bear's Paw of the same size.) 

The blocks were examined closely before working with them.  They had been hand-pieced and the stitching was still intact and seam allowances were decent.  There were a few spots on the blocks, most of which were not really noticeable.  The Bear's Paw block had the darkest spots--it was gently washed in a solution of Dawn and cold water.  The spots really didn't go away, but the block was definitely cleaner. When I found small holes in two of the blocks, the "holey" squares were replaced with squares of reproduction fabric.  Once that was done, all of the blocks were ready to use.

Some of the blocks were very wonky so I decided to create new square-in-square blocks with all of them.  Half squares were cut from 6" squares of background fabric and stitched to the sides of the blocks.  Once pressed, the new blocks were squared up to 9".  

Should the blocks be set side by side?  Doing so would make the wonkiness more obvious to my way of thinking.  It would be better to sash the blocks.


I chose a brown/black print with which to sash the blocks.  Each block would be framed and  could stand alone.  The sashing strips were cut  2 1/2" wide.  But what fabric should be used for the cornerstones?  If cut from the sashing fabric, they would not call attention to the shape of the 9-patch block and would truly frame each one. 


A 2 1/2" wide border was added to frame the whole piece.  The finished lap quilt top measures ~44" square, and the fabrics are nicely preserved!


Friday, September 17, 2021

Squares Squared

While browsing in an antique shop a while ago, a set of simple Square in Square quilt blocks caught my eye.  The fabrics used in them are those that I love, from the late 1800's and early 1900's, so I had to bring them home.  

Upon closer inspection, the blocks had been carefully hand-pieced.  And the maker was a true "scrap" quilter!  Several of the blocks contain lots of fabrics pieced together to create the needed size and shapes for the block.  :)  


A few of the blocks contain small stains but I ignored those as I was working with these blocks.  I will freshen up the entire piece once it is quilted.  

The blocks were squared up to 7", a size that worked for all but one of the blocks.  I then had 16 blocks with which to work--they could be set 4 blocks x 4 blocks. 

I wanted a color "softer" than solid black for the sashing and border strips.  Although it is not a reproduction fabric, a brown/black print from my stash was just what I was looking for.  The sashing strips were cut 2" wide.  

Among my collection of vintage fabrics was a bag of shirting squares--same era, so perfect for my cornerstones!  Because many of these squares are age-spotted, it took some sorting to find nine squares that were free of spots/stains.  Those were trimmed to 2" square.


While thinking about the border for this small quilt, I had the idea to make Square in Square blocks from the shirting squares for the border corners. I found four more "clean" squares, trimmed them to 2 1/4" and made the four corner blocks.  The size of those blocks then determined the width of the border for the quilt--3" raw.  The finished small quilt top measures ~35" square.

These vintage blocks are now preserved in a way that I will enjoy looking at them.  The next decision--How should it be quilted? 


Tuesday, August 17, 2021

A "Circa" 30s Challenge

 From my collection of vintage blocks, I chose nine that seemed to have been made from 30s era fabrics. The basic challenge was to put them together to create a lap-sized quilt.

One block was ready to use--a beautifully hand-pieced and hand appliqued block* that I trimmed to 14 1/2" square.  This would be my standard...all other blocks would be made to measure 14 1/2" square. 

A Grandmother's Flower Garden block was missing two outer hexagons.  A template was made from the existing hexagons in the block; two hexagons were cut from Aunt Grace green fabrics (which coordinated perfectly); and the two hexagons were hand pieced in place to complete the block.  It was then appliqued to a 14 1/2" square of muslin. 
 

An "improved" Dresden Plate block was also appliqued to a background muslin square.  This block was probably someone's sample block because the name of it is written on one of the solid blue pieces.  :)


The other block that was appliqued to a background square was a small hexagon piece.  It looked a little lonely when appliqued to a 14 1/2" square.  I brainstormed ideas for some block corners, but came up with none.  Three of the other blocks chosen for this project were small blocks, so I decided that this one would also be small.  The 4 small blocks would work well in a 9-patch setting for the quilt top. 
 
Two scottie blocks posed their own challenges.  First of all, they were very soiled.  Experts frown on pre-washing vintage textiles, but these blocks seemed to be well-stitched and would not be put through a washing machine cycle.  I filled a small dishpan with cold water and added a drop of Dawn.  I hand-swished the blocks in the water and then let them soak for a while.  I was amazed at how dirty the water was!  After the blocks were rinsed thoroughly, excess water was squeezed out and the blocks were laid flat on a towel to dry.  Not all of the stains are gone, but the blocks are definitely fresher! 

The other issue with these blocks was that the applique was done "on point", and the blocks measured 12 1/2".  Corners would have to be added to bring the blocks to square with the scotties pointing sideways.  Just adding corners to the existing blocks would make them measure 18" square. 

To not waste a lot of new corner fabric, the blocks were trimmed horizontally and vertically to 14 1/2", removing the original top, bottom and side corners.  Tea-dyed muslin was chosen for the new corners of each block...it just looked better than lighter muslin on these blocks.  But now the corners looked too plain!  With two strands of black embroidery floss, a running stitch was done along the seams, to match the stitching on the scottie dogs.  


The larger blocks were now ready.  The four smaller blocks would be bordered out to bring them to size, but with what color?  Several solids were auditioned, and a pastel green solid fabric was chosen --it complemented all of the blocks without overshadowing any of them. 

This challenge came together beautifully.  Nine 30s-era blocks are preserved in a 42" square quilt top.  Once it is quilted, it will be bound with the pastel green fabric.  

*I like the design of this scrappy block so much that I photocopied a large portion of it.  I can now make a pattern and templates from that.  :)