Thursday, June 17, 2021

It Just Kept Growing!

The idea to make a row quilt came to me as I looked at my collection of vintage fabric scraps and blocks from the 1930s and 40s.  

Fat Quarter Shop has been posting weekly blocks for their "Sewcialites" quilt and one of those designs reminded me of patchwork from the 30s.  So I began there, making 6" blocks from a variety of vintage fabric pieces.  Seven of them, pieced together side by side, resulted in a 42" wide row...perfect for the width of the muslin that I wanted to use.   

I had a few star blocks that a friend had made from some of HER vintage fabrics.  They just happened to measure 6 1/2"...I pieced some from MY vintage fabrics to complete a row of them.  

There were some small 9-patch blocks in my collection.  After piecing more of them, I  decided that they would be more interesting on point.  

Corner triangles were drafted to add to seven Grandmother's Flower Garden blocks so that they would be "squared up" to piece into a row.  

Three arcs left from a Double Wedding Ring quilt that I had reassembled a number of years ago found their way into two rows, too.  I cut the arcs in half and appliqued them to strips of muslin.   


I have a shoe box full of small squares of 30s fabrics.  Some were squared up to 2 1/2" and made into 9-patch blocks.  Others were used to make scrappy pinwheels and 1/2 square triangle blocks.  


It wouldn't be a 30s quilt without Scotty dogs.  After they were appliqued in place, they were top-stitched with black embroidery floss.  


And what about butterflies?  These were appliqued in place, then bodies were added with chain stitching using 6 strands of black floss.  The blanket stitching around the bodies was done with 1 strand of black floss.  

I had to include a row of bow-tie blocks, too!!!  

Each row was adjusted to measure 42 1/2" wide.  Then all of these rows were pieced together, with spacers between the rows.  The quilt now measured 72" long.  But at this point, it was only 42" wide--very long and skinny.  Time for side borders.  These were cut 5 1/2" wide.  And because I wanted Sunbonnets in this quilt somewhere, a couple of them were appliqued to this border.  

The addition of the side borders brought the width to about 52" wide.  This still seemed too narrow.  I decided to add another 5" muslin border to each side.  But just stitching those to each side would look like an "oops" to me.  To solve that problem, vintage fabric strips were pieced together and stitched between the muslin borders as spacers.  Now the quilt measures 72" x 62" and fits nicely on a twin bed!   I really like the way it grew!  :)


Monday, May 17, 2021

Fans Galore!!!

Many years ago an industrious quilter used her scrap bag and a cardboard template to cut out LOTS of wedges.  

The wedges were cut the exact size of the template.  They were then hand-pieced together with a narrow seam allowance.  

The notes on the template say to piece 7 of the wedges together to form a fan.  LOTS of wedges were pieced into fans containing 7 wedges.  I have almost 100 of them!


I do not remember how I obtained this newspaper bag filled with fans, but I think I know why this project was abandoned by the quilter...the fans will not fit neatly onto a square background block.


She even pieced 8 wedges together for a fan and tried to make that into a square block.  No luck with that, either.


The fabrics are an interesting mixture of "eras"...mostly from the 50s and 60s, and very colorful.  If they would not work into a fan quilt, what else could be done with them?

As a child, I loved paper dolls.  I was always designing new dresses for them and I remember telling my grandma that I was going to be a dress designer when I grew up.  The more I looked at these fans, the more I thought they looked like "skirts".    

I designed a simple bodice that would fit the small arc of the fans.  I selected a variety of vintage solid fabrics from my collection and chose a number of fans to work with.  Each fan was machine stitched 1/4" from the raw edge, all the way around, not only to hold the seams in place, but also to give a guideline for needleturn applique.


The skirt was appliqued to the bottom edge of the bodice; the entire piece centered on a
9 1/2" square of "dotted swiss" white on white cotton fabric, and appliqued in place. 

This is a crazy-quilt type of project because each bodice is to be "fancied" with embroidery and beads, buttons, etc.  I have my crazy quilt stitch books out for ideas, but it takes time to ponder what to do on each dress.  Twelve blocks have been appliqued so far; 3 have been "fancied".  This is definitely a Project In Progress!


After I make at least 12 more blocks for my ' "Fan"cy Dresses' quilt, LOTS of fans will remain.  Perhaps they can be used for a version of Snake Trail?   Time will tell...


Saturday, April 17, 2021

Challenging Hexagons!

Years ago, when a friend wanted to give me a pile of Grandmother's Flower Garden blocks, I couldn't say no.  The blocks were (are) awesome, having been pieced in the 1930s or 1940s.  I love the fabrics!

 
This pattern is one that I have never taken the time to master, though.  I can make the individual blocks, with 3 rounds of hexagons, but putting them together into a quilt top is something my brain cannot (or doesn't want to) figure out!  


So the first problem in working with these beautiful blocks was to come up with a way to use them that my brain COULD comprehend.  It took a while, but an idea started to form.
 
What if I trimmed the sides straight?  I quickly learned that I could not just start trimming...I would lose my reference points for where to trim next.  Lines were drawn around the block.  This made trimming so much easier and definitely more accurate!
 

Because the blocks were hand pieced, I machine stitched around the block, 1/4" in from the edges. 
 
The idea that was rolling around in my head was for an appliqued quilt, so this stitching line would also be a good turn-under line for needle-turn applique.  
 
The problem of what to do with some of the blocks was being solved, and my quilt design was coming together.  But there is another problem with these blocks...they are not all the same size!!!!

I was designing a row quilt and needed 6-7 blocks of the same size for each row.   I sorted the blocks into piles of blocks that seemed to be the same size, selected the ones I wanted to use, then trimmed and stitched around them.  They were now ready to use to make my rows of flowers.  
 
Wide muslin strips were cut for the background, from selvage to selvage: a 9 1/2" strip for the flower blocks; a 7 1/2" strip for the stem/leaves.  The leaves and flower stems that I had designed were cut from "30s" green
 
The groups of flower blocks were stitched together, side to side, by machine.  This strip of blocks was then centered on the background muslin strip and hand appliqued in place.  The bottom edge was left open so that the stem could be inserted--the stem crosses the seam between the two muslin strips.   The bottom background strip was machine pieced to the flower background strip; the stems positioned and appliqued in place; the bottom edge of the flowers appliqued; then the leaves appliqued on top of the stems.  


The difference in size of the hexagon blocks meant that each of the 4 rows of flowers was a bit different.  I decided to position the rows with the smallest blocks at the top and the largest blocks at the bottom, alternating rows of 6 and 7 flowers.  A green sashing strip was inserted between the rows.  To widen the quilt top, a "fence" border was designed, pieced and stitched to each side.  


 "Gram's Garden Rows" is now waiting to be quilted. 
 
(But only 26 of the Grandmother's Flower Garden blocks were used.  What will I do with the ones that are left???  Time will tell...)


Wednesday, March 17, 2021

Tiny Trapezoids

 I don't remember where I bought it, but I know that I've had it for a long time...this $3 quart-sized bag stuffed with small scraps.  I was attracted to it because the fabrics are from the 30s and 40s.  


 Upon opening it, I was surprised to find all pieces of the same size and trapezoidal shape!


When I first brought the bag home, I hand-pieced a few pairs of the pieces together.  But not really knowing what I wanted to do with them, the bag was put aside.  I found it again while sorting my collection of vintage blocks and fabrics.  And because I'd been browsing scrap quilt ideas on Pinterest, I now knew what to do with the tiny trapezoidal pieces! 

I began by sorting and counting them (there were more than 500 pieces in the bag!!!).   Those that were too soiled or too irregular to use were discarded.  The rest of them were pressed.  

The trapezoids were randomly machine-pieced in pairs, short end to long end.  After pressing, they were all trimmed to 1 1/2" x 2".  


 The pairs were then randomly pieced in sets of 4 to form the sides of churn dash blocks.  Since most of the scraps were pink, solid pink fabric was chosen for the corners and muslin for the background.  I had enough scrap sets to make 16 blocks.  

(Scrap sets measured 2" x 4 1/2".  Muslin sides were cut 2" x 4 1/2".  Center square: 4 1/2".  Half-square triangle blocks cut 4" to start; pieced; trimmed to 3 1/2" square.  Block: 10 1/2" raw.)

The blocks were set together with simple pink sashing (cut 2" wide) with muslin cornerstones.

It is still a mystery to me from where these scraps might have come--so many of them and all the same shape and size!  How to use them is no longer a mystery--I now have a wonderful lap quilt:  "Churn Dash and Shoo-fly"


Wednesday, February 17, 2021

Triangles and Squares

 Among the fabrics set aside for the Sunbonnet project was a packet of green and cream pieces that I had purchased at an antique shop.  

 
The packet contained squares and triangles, with one cream and green triangle pair already hand-stitched together.  

 I decided that the green color was too strong for the other colors that I was using in the Sunbonnet quilt, so these pieces were not used there.  But the packet was out and was "begging" for me to do something with it.   

First of all, the pieces needed to be trimmed so that they could be machine pieced.  I trimmed the long edges of the triangles straight and pieced a cream and green triangle together.  After pressing, all pieces were squared up to 3" square.  The half-square triangle squares were made into 12 pinwheel blocks and the squares were pieced into 4-patch blocks, all blocks measuring 5 1/2" square, raw. 

Now what?  I pulled out some of my 30's reproduction yardage and laid the blocks on the various fabrics.  These were in a spot where I could keep looking at them, and I did so for days.  No ideas came to me...

 Then one morning, while in the shower*, I thought...why not expand the block by putting the pinwheel in the center and put scrappy pieced sections around it?  The squares could be the corners of the new block!  (*my favorite thinking place...)

I pulled out my scraps of vintage 30's and 40's fabrics and started scrappy piecing them.  The scrappy pieced sections were cut into pieces measuring 3" x 5 1/2" and the 4-patch blocks were taken apart.  The 12 new blocks measured 10 1/2" raw.  

The blocks were set 3 x 4 so the quilt top now measures ~30" x 40".  I would like it to be larger, but I am still thinking about how to make it grow.  There are some green pieces leftover...perhaps they can be used in some kind of border.  I'll let you know!  :)
 

I Love it!!!

Sunday, January 17, 2021

Working With Vintage Pieces #1

 I love vintage quilts, quilt tops, fabrics, etc.  Friends who know this often give me vintage pieces to work with.  In addition, scouring booths at antique shops has uncovered vintage pieces that I've added to my collection. 

The next series of blogs will focus on how I have been using vintage pieces to create new quilts.  

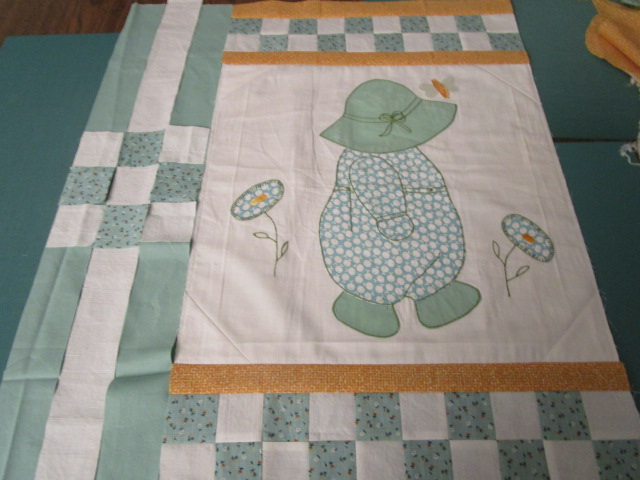
The most recently competed quilt top began with a Sunbonnet pillow top, purchased back in 2001!!!  I literally had to blow the dust off this piece before working on it--it had been sitting on a shelf next to my ironing board for many months.  Along with the piece was a collection of fabrics that I'd gathered to use with it, and my original sketch of the quilt I would create. 


The piece had a few small holes in it.  I think that is why I put off working on it.  What would I do to fix those holes?  

Each time I went to the ironing board, I would see this piece.  I finally decided that it was time to tackle the project.  

The ruffle was trimmed off and the piece trimmed to 15 1/2" square.  Because the fabric was thin, I lined it with white cotton fabric.  To cover up the small holes in the top left corner, half square triangles were added to all 4 corners using the same white fabric.

I liked the basic ideas of my original sketch, but now the quilt needed to be drafted on graph paper so that all of the parts would fit together. 

I started by adding a narrow border of gold fabric to the top and bottom of the piece.  Then added a checkerboard border using white and the light teal print.  This was followed by another narrow gold border. I was pleased with how it now looked.

But how to make it grow to be baby quilt size?  

Triple sashing all around would add length as well as width.  But just solid colors all around seemed too boring. 


 Why not add a 9-patch block in the center of each side border?   I had already planned for 9-patch blocks in the border corners...And with some creative piecing, I had just enough of the light teal print to make all of these 9-patch blocks.


The quilt still needed outer borders.  I really liked the way the gold fabric that I'd used in the small borders looked with the light teal (this brought out the gold embroidered centers of the flowers).  I went to my stash of fabric yardage to see if I had any gold fabric that might work with these other fabrics.  I found this "funky" fabric, and the more I looked at it, the more I liked it with what I'd already done.  


Solid teal and white pinwheel corners break up the busy-ness of the outer border.  And a butterfly applique near the Sunbonnet's hat covers the remaining small hole in the original piece.  I am very happy with the finished quilt top, which measures ~35" x 45".