Showing posts with label quilt making. Show all posts

Thursday, February 17, 2022

Adventures With Ruby

The adventure began when, last fall, a friend called to encourage me to go to an estate sale in a barn out in the county.  She said they were selling lots of needlework items, and she was right!  The homeowner was definitely a crafty lady, into knitting, cross stitch, quilting, just to name a few!  I found a few pieces of fabric and some notions, and as I was checking out and chatting with the relative of the deceased homeowner, I mentioned that I was a quilter.  She said that there were several quilts still in the house that they weren't sure what to do with.  I made arrangements with her to take a look at them one day the following week.

Most of the quilts had been well-used.  They were not in very good condition...not something I would be interested in having for myself, so I gave her some ideas of others who might be.  One quilt, however, caught my eye and I told her that it was worth saving somehow.  That quilt was composed of beautifully embroidered flower blocks that I recognized as Ruby McKim designs.  Something else that I noticed was that the embroidery was done on blocks cut from sugar or flour sacks...the printing was still visible on some of them!  The quilt's label says that it was started in the 1930s and finished by the maker's daughter in 1998. 

When the relative saw how excited I was about the quilt, she told me to take it and see what I could do with it.  I envisioned reworking the quilt, preserving the embroidered blocks.  As it was, the quilt was huge...40 embroidered blocks set with alternate print and white fabric squares.  I knew it would be a big job to take it apart. 


That job turned out to be even bigger than I had anticipated!  The blocks had been joined quilt-as-you-go style, but SERGED!!!  It took me many hours to take the quilt apart--my seam ripper got a workout!  Another discovery was made once the blocks were separated and the batting removed--there was iron-on interfacing on the back of the embroidered blocks.  Luckily that just seemed to easily peel off with no sticking or residue.  

So, how to clean and freshen up the embroidered blocks?  Per Rebecca Haarer, purveyor of antique quilts in Shipshewana, OxyClean™ and Dawn™ were used.  The blocks were soaked, hand washed, rinsed and laid out flat to dry.  Most of the stains came out...some of the sugar sack printing became fainter, but still remained visible on many blocks.  

At this point, the blocks were very wonky.  


After pressing them, I was able to trim all but 3 of them to  7 1/2" square.  To give them stability, I backed them with muslin quilt backing fabric which I cut to the same size and hand- basted around the block edges.  

I was asked to make small quilts for each of the quiltmaker's 3 granddaughters.  Perfect!  I had thirty six usable 7 1/2" blocks so 12 blocks would be used for each quilt.  The smaller blocks were set aside to be made into matching pillows.  

Solid green fabric was used for sashing and borders and each finished quilt top measures ~30" x 40".  The quilt tops will be layered with cotton batting and muslin backing.  Simple big stitch quilting and green binding will finish them off.  


This project has turned into more than just preserving the blocks, however.  As I worked with them, I had to know more about them!  Ruby McKim designed several series of quilt blocks for publication in newspapers and I wanted to know the name of this series and exactly when it was published.  In my collection of quilt ephemera, I have 3 newspaper cutouts from this series, which was titled "Flower Garden Quilt Patterns".  The text that goes with the block images says that the series would contain 27 designs.  


Searching the internet, I discovered the site https://mckimstudios.com and learned that this series was published in newspapers during 1929-1930.   Obviously the maker of the quilt that I was working with clipped the designs as they were published and had a pretty complete set!  

The printing on the background of the embroidered squares also intrigued me!  I could make out "Sparkling Crystal White" and what I thought said "Central Sugar Co." so I began another internet search.  Between that search and asking Merikay Waldvogel for some help, I learned that there was a sugar beet processing factory in Decatur, IN, about 20 miles south of Fort Wayne (where we live)!  It operated in the 1930s, so of course the quiltmaker would have access to sugar sacks for her needlework background fabric! 

What a fun and interesting adventure it has been to continue work that was begun almost 100 years ago and to preserve that work for future generations of the family of the quiltmakers!  


Friday, September 17, 2021

Squares Squared

While browsing in an antique shop a while ago, a set of simple Square in Square quilt blocks caught my eye.  The fabrics used in them are those that I love, from the late 1800's and early 1900's, so I had to bring them home.  

Upon closer inspection, the blocks had been carefully hand-pieced.  And the maker was a true "scrap" quilter!  Several of the blocks contain lots of fabrics pieced together to create the needed size and shapes for the block.  :)  


A few of the blocks contain small stains but I ignored those as I was working with these blocks.  I will freshen up the entire piece once it is quilted.  

The blocks were squared up to 7", a size that worked for all but one of the blocks.  I then had 16 blocks with which to work--they could be set 4 blocks x 4 blocks. 

I wanted a color "softer" than solid black for the sashing and border strips.  Although it is not a reproduction fabric, a brown/black print from my stash was just what I was looking for.  The sashing strips were cut 2" wide.  

Among my collection of vintage fabrics was a bag of shirting squares--same era, so perfect for my cornerstones!  Because many of these squares are age-spotted, it took some sorting to find nine squares that were free of spots/stains.  Those were trimmed to 2" square.


While thinking about the border for this small quilt, I had the idea to make Square in Square blocks from the shirting squares for the border corners. I found four more "clean" squares, trimmed them to 2 1/4" and made the four corner blocks.  The size of those blocks then determined the width of the border for the quilt--3" raw.  The finished small quilt top measures ~35" square.

These vintage blocks are now preserved in a way that I will enjoy looking at them.  The next decision--How should it be quilted? 


Thursday, June 17, 2021

It Just Kept Growing!

The idea to make a row quilt came to me as I looked at my collection of vintage fabric scraps and blocks from the 1930s and 40s.  

Fat Quarter Shop has been posting weekly blocks for their "Sewcialites" quilt and one of those designs reminded me of patchwork from the 30s.  So I began there, making 6" blocks from a variety of vintage fabric pieces.  Seven of them, pieced together side by side, resulted in a 42" wide row...perfect for the width of the muslin that I wanted to use.   

I had a few star blocks that a friend had made from some of HER vintage fabrics.  They just happened to measure 6 1/2"...I pieced some from MY vintage fabrics to complete a row of them.  

There were some small 9-patch blocks in my collection.  After piecing more of them, I  decided that they would be more interesting on point.  

Corner triangles were drafted to add to seven Grandmother's Flower Garden blocks so that they would be "squared up" to piece into a row.  

Three arcs left from a Double Wedding Ring quilt that I had reassembled a number of years ago found their way into two rows, too.  I cut the arcs in half and appliqued them to strips of muslin.   


I have a shoe box full of small squares of 30s fabrics.  Some were squared up to 2 1/2" and made into 9-patch blocks.  Others were used to make scrappy pinwheels and 1/2 square triangle blocks.  


It wouldn't be a 30s quilt without Scotty dogs.  After they were appliqued in place, they were top-stitched with black embroidery floss.  


And what about butterflies?  These were appliqued in place, then bodies were added with chain stitching using 6 strands of black floss.  The blanket stitching around the bodies was done with 1 strand of black floss.  

I had to include a row of bow-tie blocks, too!!!  

Each row was adjusted to measure 42 1/2" wide.  Then all of these rows were pieced together, with spacers between the rows.  The quilt now measured 72" long.  But at this point, it was only 42" wide--very long and skinny.  Time for side borders.  These were cut 5 1/2" wide.  And because I wanted Sunbonnets in this quilt somewhere, a couple of them were appliqued to this border.  

The addition of the side borders brought the width to about 52" wide.  This still seemed too narrow.  I decided to add another 5" muslin border to each side.  But just stitching those to each side would look like an "oops" to me.  To solve that problem, vintage fabric strips were pieced together and stitched between the muslin borders as spacers.  Now the quilt measures 72" x 62" and fits nicely on a twin bed!   I really like the way it grew!  :)


Saturday, June 7, 2014

A Little Quilt from Grandma

As a child, I loved playing with dolls.  Grandma knew that.  When she had some fabric leftover from making aprons, she made doll quilts for me and my sisters.  This little quilt was used to tuck in some of my favorite dolls back then.      

I have not outgrown my love of dolls.  I have kept some of my favorites from childhood and have built up quite a collection of bears.  My doll quilt is still cherished and every so often I'll bring it out and display it with some of the bears and dolls in my collection.

This quilt was the inspiration for "Granny Stars"--one of the patterns in my Little Dolly's Too pattern packet. You can find the pattern on my website: http://carolsscrapquilts.webs.com. 

Wonder if this bear has invited others to the picnic???   

Wednesday, May 28, 2014

Another "Oldie"

Last week was a crazy busy week so I did not have a chance to post.  I spent 3 days at the NQA show in Columbus.  Once again I was wowed by the beauty and creativity displayed in the quilts there.  There were many quilts with detailed applique; many with amazing machine quilting; and as usual, the ribbon winners were stunning.  I admire the determination it takes to see such a project through to the end!
The Blazing Star quilt that my grandma made for my parents took determination, too!  That is one design that must be pieced carefully so that it lies flat, especially in the center. 
This quilt was long-forgotten until I found it at the bottom of Mom's cedar chest when I was preparing her house for sale.  Like the 2 quilts I showed in previous blogs, it is thin and worn--signs that it was used often and well-loved. 
Grandma made these quilts in the late 40's and into the 50's.  I'm intrigued by the fact that the colors in these quilts are 30's colors--pastels.  Makes me wonder just how far back Grandma's scrap bag went!!!  I will most likely never know.

Friday, May 16, 2014

A Very Traditional Quilt

Grandma's smaller apron and dress fabric scraps went into this Dresden Plate quilt.  I'm guessing that she acquired scraps from her quilting friends, too, because of the variety of fabrics in this quilt.  This one was used on my older sister's double bed (she had her own room!!!). 
The "plates" were pieced by hand and hand appliqued to the background squares.  The blocks were set together by machine, however.  Grandma had a sewing machine--one that started out as a treadle, but was converted to an electric machine somewhere along the line.  That machine saw lots of activity because Grandma loved to sew. 
This quilt was hand quilted by the church quilting ladies.  Even though it was often washed (because it was used and loved), the quilting stitches are still intact.  Those church ladies did quality work.  :) 

Friday, May 9, 2014

The beginning of my love of scrap quilts

I've decided to share with you the vintage scrap quilts in my collection.  Perhaps they will inspire you as you work with your own collection of scraps.
My grandmother was a quilter.  She made quilts for the family from scraps leftover from making house dresses and aprons.  My sister and I slept under Sunbonnet Sue quilts that Grandma made for us.  My quilt was sashed/bordered in green (pictured).  Grandma used pink to sash/border my sister's.
Black embroidery stitches accent the appliqued Sunbonnets.  And the hand quilting was done by the ladies in Grandma's church quilting group.  My sister and I have fun reminiscing about the aprons Grandma made for us when we see certain fabrics in these quilts.  And I like to think that I came by my love of scrap quilts by osmosis...sleeping under this quilt as I grew up!
  It is ragged in some places because it was used.  But that also shows how much it has been loved. :)

Thursday, May 1, 2014

Taming a Scrap Quilt

Scrap quilt blocks tend to be "busy" with all the different fabrics being put together.  Unless you like the busy-ness, it is necessary to calm things down.  How do you do this?  By strategic use of a solid fabric. The solid fabric gives the eye someplace to rest as one studies the overall design of the quilt top. 
Makers of old scrap quilts used muslin as their background fabric.  Some chose a solid coordinating color fabric for the sashing between their scrappy blocks. 
Unbleached muslin, white and black are all good solid fabric choices.  Audition each against your scraps to see which one shows off the colors in your blocks the best.  If there is a predominant color in your scrap blocks, perhaps that would be a good solid color choice.  Other colors to try in sashing, borders or cornerstones are teal and brown. 
Lay out your blocks against your chosen colors, either on the floor or on your design wall.  Stand back and study the layout.  The color choice(s) will become obvious.  (If you find that you need to shop for your solid fabric, be sure to take all of your scrap blocks to the store with you.  Find a spot where you can lay the blocks against several colors, stand back and decide.  Again, the color choice should become obvious.)  How satisfying to find just the right color to show off your scraps!   

Wednesday, April 23, 2014

Use Your Scraps, Part 7

In previous blog posts I have given you suggestions for strips, squares and triangles.  If you have sorted your scraps, you have probably found fabric chunks that do not fit into any of those categories, and you might be wondering what to do with those.
An easy solution is to create your own fabric from them by sewing them together.  You can combine the colors randomly or sort so that you are only using neutrals, only greens, only reds, etc.  The most important "rule" when creating your scrappy fabric is to make sure you are joining STRAIGHT edges.  This will insure that your finished fabric will lie nice and flat.  So, once the fabric chunks have been pressed, trim a straight edge on each scrap and pair up the scraps according to the length of the straight edge.  Stitch with a 1/4" seam and press the seam allowance to one side.  Trim a straight edge on this pair of scraps and add another scrap to it.  Continue to add pieces in this way until your new fabric is large enough to cut your desired shape from it.
Leftover pieced units from previous quilt projects can be worked into this fabric in the same way as other fabric scraps.  I like to sort my scraps into "large" and "small" before beginning to create my fabric.  I piece the small scraps together when I know that I will be making small blocks.  I piece the larger scraps together when I know that I will be making large blocks. 
For more detailed instructions on making scrappy pieced fabric, check the "How-To" tab on my website:  http://carolsscrapquilts.webs.com.  
Have fun creating your own unique fabric!   

Thursday, April 10, 2014

Use Your Scraps, Part 6


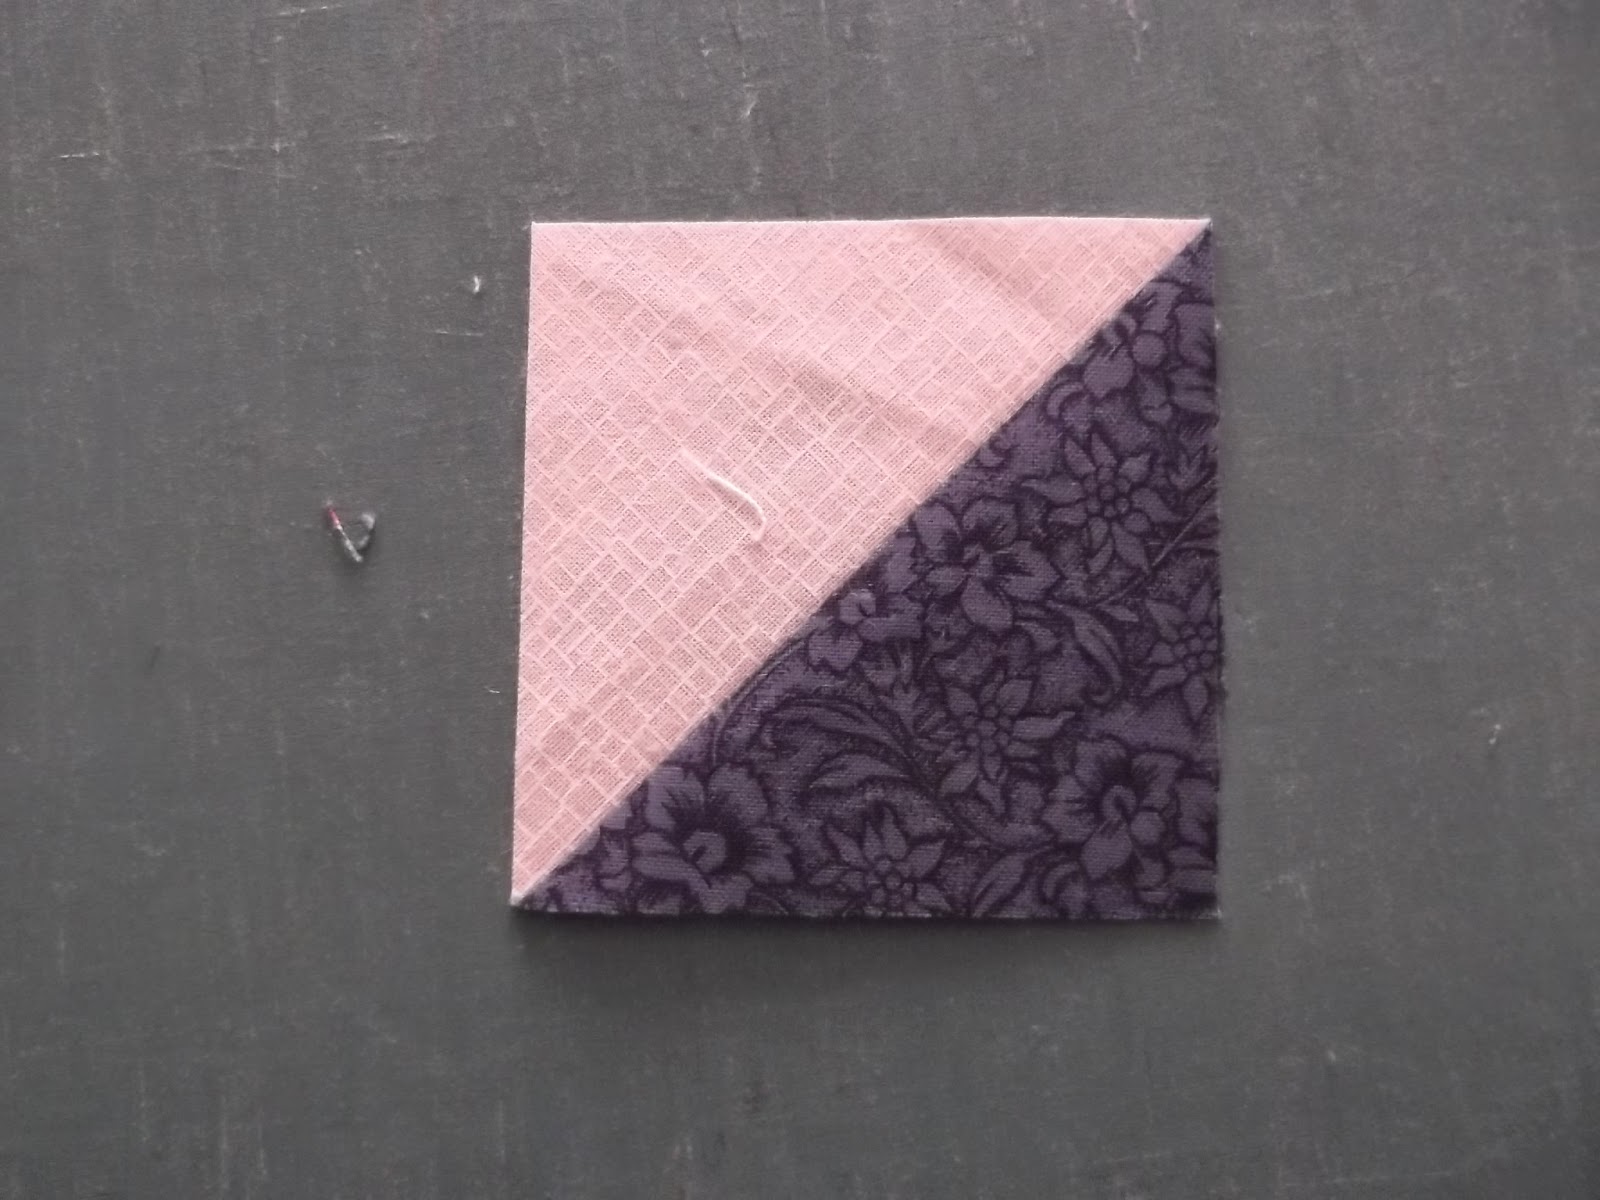
Many quilt projects result in half-square triangles being left behind.  Once you have a collection of them, turn them into squares.


Cut a strip of background fabric that is wider than your largest triangle is tall.  Place the half square triangles along the edge of the strip--raw edges of long side of the triangle matching to the raw edge of the strip.  Stitch them in place.


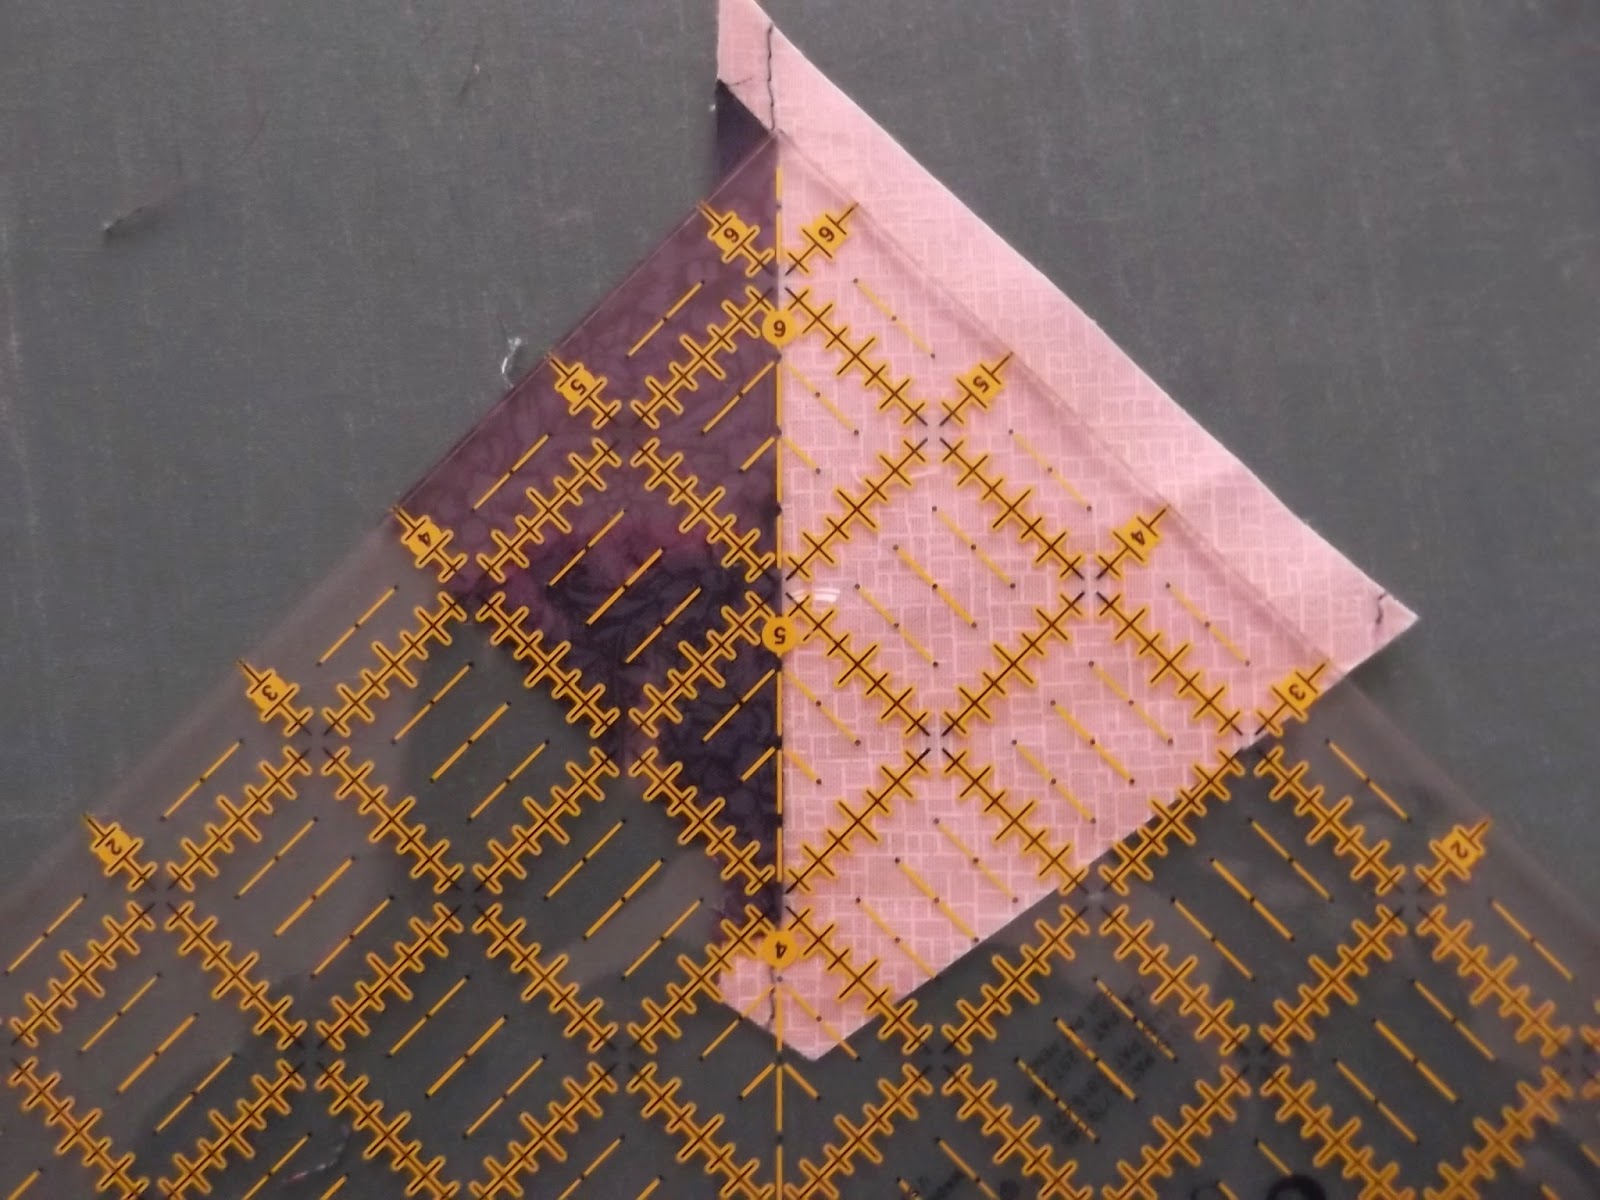
Cut the triangles apart, leaving extra fabric around each one.  Press the seam toward the dark fabric.  Using a small square ruler, align the seam with the 45 degree line on the ruler to square up each triangle square. 


Once they are all squared up, the squares can be trimmed down to the size needed for your project.  Be careful of the edges of the background fabric.  They are now on the bias, so handle the finished squares carefully.

(To end up with edges that are not on the bias, cut squares of background fabric slightly larger than the short side of your half square triangle.  On the wrong side of the fabric, draw the diagonal of the square.  Match the long side of the half-square triangle to the drawn line.  Stitch the triangle in place, using the drawn line as a guide for your 1/4" seam.  Add another triangle to the other half of the square.  Cut apart on the drawn line.  Press seam allowance toward the dark and square up as above.)
Great scrappy quilts can be made from these new 1/2 square triangles--pinwheels are fun.  Be creative and play with the design possibilities. 

Wednesday, April 2, 2014

Use Your Scraps, Part 5

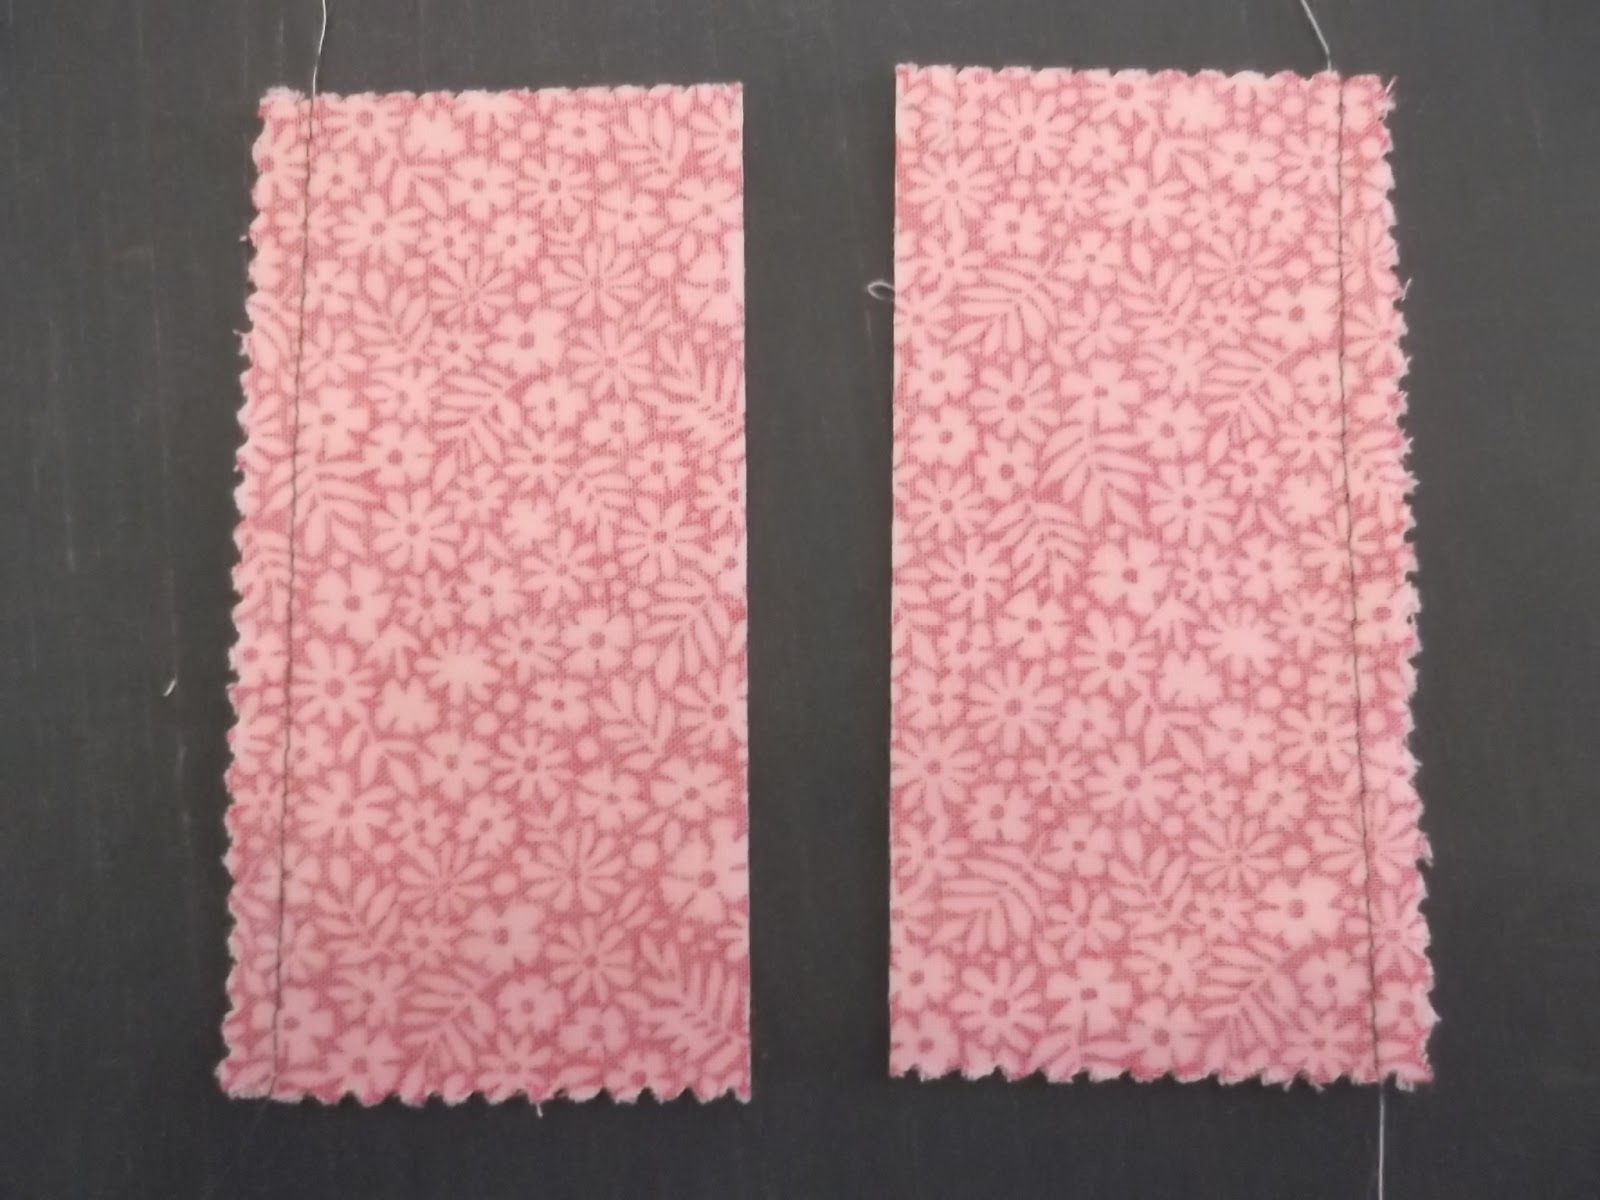
Here's another idea for using your charm squares--a fun way to make 4-patch squares.  Right sides together, pair up a print charm square with a solid square of the same size.  Using a 1/4" seam allowance, stitch the squares together on opposite sides.  Then cut the sewn squares apart through the center (the cut will be parallel to the stitched edges). 

Press the seam allowances toward the print fabric.  Right sides together, place one pressed square on top of the other, with the print rectangle on top of the plain rectangle below and the plain rectangle on top of the print rectangle below.  The center seams should butt nicely to each other.  Pin in place.  Using a 1/4" seam allowance, stitch along the opposite outer edges--this stitching will be perpendicular to the center seams.

Again, cut the squares apart through the center--parallel to the seams you just sewed.  Open out and press.  You now have two 4-patch squares!  Square up as necessary.

I think this technique is perfect for those charm squares with pinked edges-- which I find so hard to work with!  Because of the way these 4-patch blocks are constructed, those pinked edges disappear!
Try this...you will like it!  :)


Thursday, March 27, 2014

Use Your Scraps, Part 4

Do you have a collection of Charm Squares?  If so, are you wondering what to do with them? 
Here's a quick and easy idea:  Put them in a paper bag and mix them up.  Draw them out one at a time (without peeking) and sew them together as you draw them out.  Charm squares typically measure 5", so once they are sewn with a 1/4" seam allowance, they will finish 4 1/2".  For a lap quilt that measures ~45" x 45", you will need 100 charm squares. 
Idea #2:  Draw the diagonal line on the wrong side of each charm square.  Pair a print square with a solid background square, right sides together.  Stitch 1/4" either side of the drawn line.  Cut on the drawn line and press the seam allowance toward the print.  You will end up with a collection of 1/2 square triangle blocks that can be arranged on your design wall as you wish. 
Other ways to cut charm squares:  cut in 1/2 vertically or horizontally to create 2 pieces 2 1/2" x 5".  Use these for scrappy Rail Fence blocks.
Cut into quarters, creating four 2 1/2" squares. Make scrappy 4-Patches or 9-Patches from an assortment of these small squares. 
As you are shopping for quilt patterns, seek out those that use charm squares.  :)


Wednesday, March 19, 2014

Using Your Scraps, Part 3

More ideas for using your collection of fabric strips...Sew the strips to foundation blocks. 
From any thin fabric you have in your stash, cut squares--anywhere from 6 1/2" to 10 1/2" square.  (The larger your square, the longer the strips will need to be to cover the square, so determine the size of your foundation square by the lengths of the strips in your collection.  Another thing to think about--the smaller your foundation square, the more of them you will need to make a large quilt top.)
You will cover the foundation square with the fabric strips, using the sew and flip technique, then you will trim the outer edges back to the size of your foundation square. 
Begin in the center of your square.  Lay one strip, right side up, across the diameter (or near diameter) of the square.  The ends of the strip should hang over the edges of the square.  The next strip you choose can be a bit shorter than the first.  Place it on top of the first strip, RIGHT SIDES TOGETHER, matching the long edge on the right-hand side.  Stitch along this edge, using a 1/4" seam allowance.  Open out the stitched strip and finger press the seam.  Choose another strip, a bit shorter than the one it is next to (but be sure that it covers the foundation square) and repeat the process.  Continue choosing and sewing strips until the entire right-hand side of the foundation square is covered.  Rotate the square and do the same to cover the other side of the foundation square. 


 At this point, it will no longer look square.  Turn the entire piece over so that your foundation square is visible.  Using your square ruler and rotary cutter, trim the block to the original size of your foundation square. (Your foundation square may have shrunk with the stitching.  If so, do not follow the edges of the foundation square, but trim the block to the size it was to begin with.)
You can choose the color of the strips at random for a true scrappy look.  Or, you can use the same color strip down the center of each block and put light strips on one side and dark strips on the other.  Play with the placement of the blocks when you are ready to set them together.  Alternating the direction of the strips creates interesting designs.  Use my pictures for inspiration and have fun!!! 


Friday, March 14, 2014

A Bump in the Road

Well, so much for resolutions!  I'm already a couple of days late in blogging this week, and this post will NOT be about scrap quilts.  I am playing nursemaid to a husband who had surgery on Tuesday to repair a broken ankle.  I had good intentions of continuing with ideas for using fabric strips, but my brain is not into it right now and my time is spent doing other things.  Each day is getting a little easier, though, so next week I'll be back with some strip quilt ideas, complete with pictures.  Stay tuned!  (PS:  so glad that I'm a quilter!  Helps to keep my sanity!!!) :)

Wednesday, March 5, 2014

Use Your Scraps, part 2

Have you been piecing strips together?  Along the long edges?  Making strips of multiple strips so that you have pieces that are 6"- 8" wide?  If so, are you now wondering what to do with them??
Interesting quilt tops can be made merely by cutting squares from these pieced strips. 
--Cut 6 1/2" squares across the strips.  Lay them out so that alternate strips are horizontal while the others are vertical (a Rail-Fence type layout).  Mix up the colors as you lay out the squares.  A baby quilt, finishing 36" x 42",  will use 42 squares (set 6 x 7).  Cut more squares for a larger quilt.
--If you have the width to do so, lay your square ruler on the pieced strips so that the strips are on the diagonal of the square.  (Cutting the squares this way will require more pieced strips than the first method...but triangles resulting from this cutting method can be pieced together to form more squares.)  Lay out these squares so that alternate strips are pointing in opposite directions and play around with color placement.  Some interesting designs can result.
--You can also just alternate a strip square with a solid color square and do some fancy quilting in the solid square.
Use your imagination and be creative.  You will be amazed at the quilt you can make just by piecing together your leftover strips!    

Wednesday, February 26, 2014

Use Your Scraps, part 1

The whole point of sorting your scraps and leftovers is NOT storing them.  The real point of sorting is knowing what you have so you can begin to use your scraps and stash.  :)
Keep your eyes open for patterns that use the stash items you have.  In the meantime, pull out some strips, small squares or half-square triangles.  Press them so they are flat and ready to work with.  Keep a box of them next to your sewing machine and use pairs of them** as "run-offs" while you are piecing other projects. (**Pair up your squares or triangles by light/dark.  Strips can be paired up according to length; choose colors at random.)  Before you know it, you will have enough of these units to use in a quilt top!

Thursday, February 20, 2014

Boxes, Bags, Bins

If you are like me, as you've sorted your scraps, you've put them in boxes, bags and bins that you've had on hand. The 18-gallon plastic totes hold a lot!  Large shopping bags do too.  Shoe boxes, computer paper boxes and smaller totes are good depending on the size of the scrap collection.  If you choose clear plastic containers, you can easily see what is inside.  Label other containers with the contents.
My favorite containers for not only scraps, but also projects in progress, are the flat boxes I gather at my local Aldi store (a bulk-type grocery store).  Because of the way I store my scraps, they need to be pressed before I can work with them.  As I press them, I put them into a flat box so they stay nice and flat.  As pieces are cut for a quilt project, they go into their own flat box so they are all together when I am ready to begin putting them together.  I keep a flat box next to my sewing machine.  Pieced items that need to be pressed before the next step can be easily carried to and from the ironing board. And if I get interrupted and the project has to be put away, it goes into its own flat box, ready for me to pick it up and start again. 
(These flat boxes fit nicely inside an 18-gallon tote!  I have a lot of them stored inside MY 18-gallon totes...projects waiting to be completed and already pressed leftovers from previous projects...they will get used eventually!)

Wednesday, February 12, 2014

Storing Scraps, Part 3

I am not UNorganized.  I am not VERY organized.  I store my scraps and leftovers in ways that draw from both of these styles.  So, I call myself SOMEWHAT organized.
All of the charm squares that I have collected over the years are in one box.
Smaller squares are in their own zip-lock bags, somewhat sorted by size.
1/2 square triangles (those that haven't been passed on to a friend who makes miniature quilts) are in THEIR own zip-lock bag  
All of the strips leftover from projects are overflowing the large antique crock in which I put them. (I really do need to plan a strip-pieced quilt!)
Small scraps of fabric (smaller than 1/4 yard) are stuffed into a couple of plastic totes...a ready source for applique or scrappy piecing.
Larger pieces of leftover fabric (including fat quarters) are stored in boxes according to color.
My collections of 30's reproduction fabrics and late 1800's reproduction fabrics are in their own boxes.
And within my sewing room, I know where to find each of these collections. When I'm ready to start my next scrap quilt project, I dig into the collection I need.  That's when the fun begins! 


Wednesday, February 5, 2014

Storing Scraps, Part 2

So, how organized are you?  Unorganized, somewhat organized or very organized?
If you are a very organized person, perhaps you don't even like the idea of having fabric SCRAPS!
You are one who takes the fabric leftover from a quilting project and cuts it up right away into pieces that will be useable in a future project.  You cut 2 1/2" strips, 2 1/2" squares, 5" squares, or any other size squares you can comfortably get from your leftover fabric.  You then store these new pieces in their own (carefully labeled) containers so you know just where to find them. (Perhaps you even sort them by color...)  When you are ready to make your next quilt, scrap or otherwise, your pieces are all cut and ready to use.
I wish I were that organized, but I'm not.  Next week I'll tell you how a somewhat organized person stores her fabric scraps.  :)

Wednesday, January 29, 2014

Storing Scraps, Part 1

How should you store the fabric scraps you have decided to save?

That depends on the type of person you are.  Are you unorganized?  Somewhat organized?  Very organized?

If you are unorganized, you will use the easiest way to store fabric scraps.  Just stuff them into whatever container you have available--a bag, a box, a plastic tote, etc.  Each time you decide to make a scrap quilt, finding fabrics to use will be a new adventure for you.  You probably won't remember what you have stuffed into the containers, so you will have the joy of dumping them out and sorting through a mountain of scraps.  This will take some time, but on a day when you really don't feel like sewing, but still want to play with fabric, this will be the perfect activity.  As you sort, you will recall the projects you made with the various fabrics, too.  Just don't get too involved remembering that you forget your original task--finding fabric for the scrap quilt you want to make.  Happy sorting!  :)