Showing posts with label scrap quilt making. Show all posts

Monday, February 19, 2024

Brown Goose

A year or so ago, in with my collection of fabric scraps and projects that had been started, I found a box of small triangle cut-aways---in pairs!  LOTS of them!!! 


I cannot recall where they came from, but I had obviously looked at working with them sometime in the past.  In with them was a pieced block--"Brown Goose".  Plus, being somewhat of an amateur poet, in the box was a poem** that I had written about Brown Goose.  It was time to continue this project.


I set the box of cut aways next to my sewing machine and used the pairs as my thread savers ("leaders and enders") as I was sewing other projects.  As the pairs were sewn, they were set aside.  


It took me several months to sew all of the pairs.  Once all were pieced, they were pressed and trimmed to 1 3/4" square.  


Sixteen squares were needed for one Brown Goose block.  I ended up with enough squares to make 14 blocks!  The blocks finished 5" square. 

I re-read and tweaked my poem to ponder how to use the 14 blocks. 

**Little Brown Goose was waddling along,

   Enjoying the day,

  Singing a song.

Out jumped her buddy, Bright Green Frog.

  They stopped to chat

  On a nearby log.

Miss Blue Bird was flying by.

  When she saw her friends,

  She stopped to say “Hi”.

All their noise woke Furry Gray Mouse.

  She peered out, saying

 “Who's on my house?”

Seeing her pals, she cried “It's you three!”

 “Stay right there.

  I'll put on some tea!”

She brought out the tea, a cookie plate too.

  They talked and they laughed

  Like good friends do.

Chatting with friends over cookies and tea

  Is the best kind of day!

  Don't you agree?

I looked through several pattern books for blocks to represent the characters and other elements in the poem.  I even found a block called "Tea for Four"!  The challenge, then, was to draft them to finish 5".   

Thank goodness for a stash of scraps!  Bits of the brown fabric were needed to make the fourth "T" in the "Tea for Four" block.  I just happened to find some squares of the brown fabric there!  


Sashing and cornerstones completed this small quilt.  It was just a fun little project (that took over a year to complete!).


Thursday, January 18, 2024

Waste Not

I get excited when I see the possibilities in fabric bits that others might consider waste.  

Depending on their size, I like to play with triangle cut-offs.

At a fall retreat, we were given kits to make blocks for the Cluck Cluck Sew pattern, "No-point Stars".  In this pattern, the stars in the blocks are created using "Triangle Corners" or "Diagonal Corners" (A small square is placed in the corner of a larger square.  After you sew on the diagonal of the small square, the corner is trimmed away and the remaining small triangle is pressed to the outside.)

For these stars, 3" squares were placed on top of 4" squares.  The leftover trimmed corner was large enough to sew a 1/4" seam and finish with a decent size half square triangle square. 


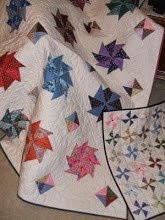
Because 3" squares were placed on adjoining corners of the 4" squares, there was an unexpected result using some of the half square triangle squares to make pinwheel blocks!  (See the small pinwheel in the center of the square on the left?)


The binding for one of my prayer quilts was made from striped fabric.  I joined strips of the fabric using  diagonal seams.  Instead of throwing away the seam trimmings, I decided to stitch them to scrap squares of white fabric.  Pinwheels from these triangle trimmings turned out fun, too!


Often I will find random triangles in scrap bags that are given to me.  As I did with the striped triangles, I will stitch these to scraps of background fabric, then cut them out and trim to size.  


What will I do with these little blocks?  Right now I have a basket in which I put little blocks that I have either made or inherited.  My vision is that someday, they will be made into a sampler quilt.  TBD  :)  In the meantime, it is definitely fun to play! 

Sunday, November 19, 2023

From the Heart

The prayer quilt ministry at my church was begun last Sunday with 3 quilts.  The congregation was very receptive to this new ministry and willingly participated in the tying of them and praying over them.  After the service, I received requests for prayer quilts for other congregation members.  So I am busy making more. 

I have several fat quarter packs that have been waiting to be made into quilts so I chose to use the Yellow Brick Road pattern.  The pattern's 4 block x 5 block quilt requires 6 fat quarters--perfect, for that's what my fat quarter packs contain!

The pattern is quite simple...one is directed to cut the fat quarters into strips of 2 different sizes.  These strips are then sewn together "in a variety of combinations", cut apart and then sewn again "in a variety of combinations".  With only 6 fabrics, there is a limit to the "variety of combinations" one can make.  :)

When the blocks are all created (3 different designs), one is told to "arrange the blocks in a random order, turning the blocks as needed so that color placement is pleasing and seams are offset (if possible)."  The main thing I try to accomplish when laying out the blocks is to avoid having the same fabric next to itself--not always possible!  And after trying several different layouts with this first group of blocks, I found that it was impossible to have all of the seams offset, so I stopped worrying about that, too!  

Many of my quilting friends make quilts for charity.  I've heard some of them comment that one doesn't really have to be so fussy with charity quilts--the recipients will love them no matter the size, design, etc.  I, for one, certainly hope so.  And I hope that they can feel that these quilts are made from the ❤.  :) 


Sunday, September 17, 2023

Road Construction

Some chunks and strips of fabrics featuring roads, road signs, and vehicles were in a bag of scraps that I brought home from a retreat that I attended a year ago.  These were leftovers from a fellow quilter who was making a quilt for her grandson.


Since a number of the pieces were fairly long strips, I planned that this lap quilt would be made from horizontal "stripes".  I began by piecing together chunks or adding chunks to strips to make stripes approaching the width needed for a lap quilt.  In my stash, I found coordinating fabrics from which I cut more long strips.  Now I needed to map out the details of how all of these stripes would go together.

At one of this year's summer retreats, I took advantage of a large work space to lay out the stripes.  (While doing so, a retreat friend contributed some "truck" fabric leftovers to add to my quilt!)  I was able to determine the best order of the stripes, then cut them all to the size of the shortest one. 


When pieced together, the quilt top measured ~31" x 34".  I wanted to add a 3" border to make it bigger.  I did not have enough of any of the fabrics that I had used to construct the basic quilt top, so had to go shopping. 


I purchased a gray fabric that blended with the gray in the fabrics of the quilt top.  But when I laid that out next to the quilt top, it just seemed kind of "blah".  I went "shopping" in my stash and found a black fabric with a subtle gray print.  This did a better job of framing the quilt top. 


Corner squares were cut from some of the leftover vehicle fabrics. 


Construction complete with no major road blocks!  When it is tied up and bound, this lap quilt will be ready to be used and enjoyed.

Friday, August 18, 2023

Just Ducky

In the past, when working with fabric leftovers, I was not really concerned about the size of the final project--it would be whatever it turned out to be.

But now that I am using leftovers to make lap quilts, I am finding that having a "target" finished size helps me to develop a plan.  

So, how could I turn four 6 1/2 " squares (plus a few smaller pieces) of a duck print fabric into a usable lap quilt? 

This fabric is very colorful.  So, looking at the colors in the print, I searched my stash for possible fabrics to use in making a lap quilt.

First, I bordered out the print squares so that they would be 12" finished.  The 1 1/2" blue strips that "came with" the print squares were used as the inner border.  Fort the outer border, I chose lime green.  Those strips were cut 2 1/2".  


Now that I had these four squares, what could I do with them?  If I made the quilt top basically a 9-patch, I would need 5 more blocks.  

I had plenty of white fabric and more of a similar shade of dark blue fabric.  An orange fabric would be fun to use, too.   

I sketched out a plan for 9 patch blocks to surround the print blocks.  The squares would be cut 4 1/2".  I decided to position dark blue squares to create an X design across the quilt top.  A bright orange print was placed in the 9-patch corners.  Smaller pieces of the duck print fabric were sewn together so that a 4 1/2" square could be cut from them.  This square was used in the center of the middle 9 patch block for continuity.  


 The finished quilt top measures 36 1/2" square.  It's bright and cheery, and Just Ducky!  :)


Monday, July 17, 2023

Sailing Away

Lap quilts are the perfect size with which to experiment with leftovers...both mine and those that I "inherit" from others.  

I was given 15 squares, plus several scraps, of a colorful "boat" print. The squares measured 6".

Since 15 was an odd number to work with, I was able to piece an additional 6" square from the scraps (just like our quilting fore-mothers did when they didn't have a big enough piece for their design!) . Now I would be able to set the blocks 4 x 4.


Something had to be done to the 6" squares to make them GROW into a decent size lap quilt.

Using the colors found in the print, I searched my stash to see what fabrics I could use to border out the squares, making them bigger.  I found a dark turquoise "blender" fabric that would be perfect!  However, there wasn't enough of that fabric to add borders to all sides of each square, so the dark turquoise became the top and bottom borders of each square.  A solid red fabric was used to border the sides, with solid white used for the corners of the blocks. Because all of these border strips were cut 2", the blocks now finished at 8 1/2".


To help the quilt grow a bit more, the blocks were set with solid turquoise sashing, cut 2" wide.  To mimic the smoke coming out of several of the boats in the print, a grey "blender" fabric was used for the cornerstones. :)  The finished lap quilt top measures ~38" square.  

After the quilt is tied, it will be bound with the solid turquoise fabric, and will be ready to sail away to a new home.  :)


Friday, March 17, 2023

A Detour Along the Yellow Brick Road

Whenever I have a set of six coordinated fat quarters, I like to make small quilts from the Yellow Brick Road pattern, by Atkinson Designs.  According to the pattern, six fat quarters will make either a 48" x 48" quilt or one that measures 48" x 57" when borders are added to the pieced blocks.  

For a recent charity lap quilt, I worked with a collection of fat quarters in fall colors.  Following the instructions in the pattern, 20 blocks were made.  When set together, 4 blocks wide x 5 blocks long, the quilt top measured ~36" wide x ~45" long.  

The other lap quilts that I have been making are square, measuring around 36".  None have been larger than 45".  Since I used most of the fabrics in this collection, I did not have enough fabric to make more blocks.  So I removed the last row and finished off one lap quilt.   

I now had 4 leftover blocks.  What could I do with them?  From my stash of leftover fabric scraps, I gathered fabric pieces in similar fall colors.  I scrappy pieced 12 more blocks, trying to use mostly fairly large "chunks" of fabric (so the blocks would look much like the YBR blocks), 

Scrappy piecing the blocks was much more time consuming than making the YBR blocks!  But it was a good use of scraps that I'd collected, and a new lap quilt was "born".  

I've studied the pattern to see how to use it to make only 16 blocks.  It might work to use only 5 fat quarters--the blocks will be pieced the same, just fewer of them and less variety of fabrics.  This is something that I will try in the coming weeks as I continue to make lap quilts for the local VA hospital.  :)  :)  

Monday, January 2, 2023

On Safari in Kenya

My trip to Kenya was called "The Ultimate Safari".  It seemed that every day was some kind of adventure with animals!

On the first day we visited the Giraffe Center, outside Nairobi, where the Rothschild giraffe species is being conserved.  We were able to get up close and personal with these beautiful creatures and feed them special treats. 


On the second day we headed north to the Ol Pejeta Conservancy where we spent the next 3 days.  We stayed in tents and went on safari drives 2 times each day. 

We had to stay in our jeep during the safari drives, but our guide took us as close to the animals as he could. ( And the zoom feature on my camera helped a bit, too!)


Each day we saw a variety of birds, on the drives and also around the campground.  (Deer and baboons roamed the campground, too! )

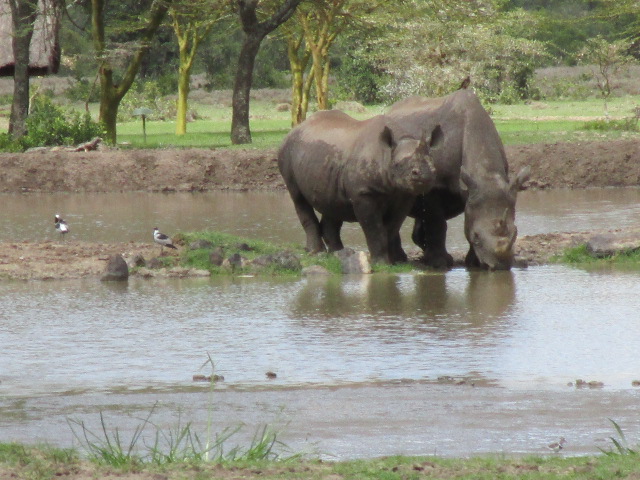
One morning we were able to pet a black rhino...Barak is 27 years old and blind.  He's in his own protected environment and doesn't mind the attention.  

Back to Nairobi, a visit to the David Sheldrick Elephant Orphanage.  Endangered baby elephants are rescued from the wild and brought back to health until they are able to be on their own again.  


And a day trip from Nairobi took us to Lake Naivasha.  We boated near the hippos then walked the grounds to be close to giraffes (Yes, giraffes are my favorites!!!)  :)


This trip had been rescheduled 3 times.  It was definitely worth waiting for, and was truly an amazing adventure!


Monday, October 17, 2022

Fugitive Green or Truly Tan???

 I recently sorted through my collection of vintage/antique blocks to determine which blocks I would like to use for my next project.  One block in particular "spoke to me".  

I do not recall where this block came from...purchased or given to me???  From the bits of thread still along the outer edges of the block, it appears that it had once been part of a larger quilt top.  

I like to really study my vintage blocks before I use them to see how they were made and make sure that they are still in good shape.  This block was neatly hand-pieced, using very tiny, even running stitches.  The seam allowances are ~1/8" wide.  The overall block is a little bit wonky, due to the bias edges on the small checked triangles, but still very workable.  The most interesting thing about the way this block was put together is that each red unit is one piece, not two diamonds pieced together!!!  


Searching through my various books of quilt block designs, I could not come up with an exact name for this block.  The 4 corner sections remind me of flowers found in basket blocks...lilies or tulips?  The closest I could come was Sage Bud or a Turkey Tracks Variation (although the center square was much larger in that design.)  I like the way that the Shoo Fly design stands out in the center of this block! 

I can usually tell the age of a block by the colors and fabrics used in it.  This one has me a bit stumped, however.  The check fabric is printed, not woven.  The bright yellowish solid fabric is the cheddar or chrome orange color typically found in quilts of the 1800s.  The red fabric is a thin woven, and (thankfully) the color does not bleed when wet or pressed with a hot iron.  

The solid tan fabric is interesting.  Because this is a variation of a flower block, did the tan fabric start out as green with the color fading over time?  According to Barbara Brackman in Clues in the Calico, p.61: "Synthetic greens appeared around 1875.  The synthetics were often fugitive; like most synthetics, they did not fade true but took on a distinctly brownish cast when exposed to light and washing...Clues to the original shade lie in the...fabric visible inside seams ...where light has not done as much damage."  I have looked closely at the insides of the seams...I see no indication of another color, only tan. 

 "Some believe the red, white and tan* quilt to be a distinct end-of-the-century fashion, but an intentional red, white and tan quilt is likely to be rarer than those that have faded...Occasionally I do see a red, white and tan quilt that was intentionally designed in the color scheme, but most are copies of older quilts, with the copier unaware that the tan in the model was once green."

With that information, I am guessing that this block was made circa 1900.  Because it doesn't really fit with other antique blocks that I have, this block will be the focus of a medallion wall quilt.  Fabrics have been chosen...now to plan the various borders.  


Stay tuned...one of my upcoming blogs will be a show and tell of the quilt tops I've started over the past few months--finished! 

*Floral applique quilts are the ones to which she is most referring here...